Archive | Burgers, Sandwiches, and Pizza RSS feed for this section

Mozzarella Stuffed Meatballs

15 Aug

Just reading the title of this recipe you know it’s gonna be a good one… and then you look at the picture. I’m sold! I don’t know why I thought of making this last week or what inspired me, just day dreaming I guess. I just made this one up and it’s a definite keeper! I ate the meatballs plain with a side salad, but you can throw them on pizza, use in spaghetti, make a sub, put in soup… The center oozes mozzarella cheese! If you don’t have time to stuff the meatballs you can just add the cheese into the meat mixture and get cheesy meatballs, but I suggest taking the time (at least on your first try) to stuff them with the mozzarella.

Makes 12 meatballs, serves 6

Ingredients:

-Meatballs-

1.25 lb (20 oz) Italian Seasoned Ground Turkey, Lean. I used Jennie-O

1/4 cup basil

1/4 cup bread crumbs

1 egg, lightly beaten

1 clove garlic, finely chopped

Large pinch of salt and pepper to taste

1 cup mozzarella cheese, shredded

-Marinara sauce-

1/2 tbsp oil

1 clove garlic, finely chopped

1 cup crushed tomatoes with Italian seasonings, an overflowing 1 cup

Large pinch of salt

1 tbsp balsamic vinegar

Directions:

Preheat oven to 400 degrees F.

Grate your cheese and separate it into 6 portions.

Combine all of the ingredients for the meatballs except cheese, unless you don’t want to stuff them and then you can add the cheese, but beware because they will spill melted cheese onto your baking sheet. Who doesn’t like crispy cheese though? Divide the meat mixture into 6 balls. Take out 1 ball, divide into 2,  press into a mini-looking patty with a little dip in the center, stuff with mozzarella (1/2 of a pile for each meatball) and press down to make it stay, and wrap the meat around it forming a ball. Place the meatball on a greased cookie sheet. Repeat with the remaining meatballs.

*The meat mixture may be a little sticky… feel free to add more bread crumbs or experiment with just using the egg white instead of the whole egg. Don’t add too much of the bread crumbs because the meatballs could become dry; I just suffered through the sticky mess and mine were nice and juicy.

and then… mozzarella pushed in to–> wrapped up in Italian love 🙂

Once you have finished making your bundles of love bake for 15-20 minutes until done, turning once. To check for doneness I just cut into one.

While the meatballs are baking you can make the marinara sauce. Add the oil to a medium saucepan and saute garlic until fragrant, 1 minute. Add crushed tomatoes and salt, stir until warmed through. Add the balsamic vinegar, stir, cover and remove from heat. Once the meatballs are done place them into the sauce, warm over medium heat, and serve!

I like mine with some grated Parmesan and fresh basil on top! Ooooo look at the oozing inside! This was another food-gasm inducing dish, enjoy 🙂

NUTRITIONAL INFORMATION:

Calories: 246   Fat: 12.7g (3.7g saturated)   Fiber: 1g   Protein: 23.7g   Sodium: 719mg

*Can’t eat 6 servings? Freeze some and pull out to thaw whenever you are in need of this delicious meal:)

Butter Chicken Pies

21 Jul

Have you ever heard of “Butter Chicken”? If you haven’t it’s an Indian dish that is very popular among all Anglo-Saxons (ha! you will see why I say this later). It’s made with chicken, of course, that’s marinated in a variety of Indian spices and is then cooked in a tandoor (a clay oven), but can be cooked other ways. The sauce is made with… you got it, butter! There is also tomato paste, Indian spices, and cream (some sugar too). It’s served with rice, naan, and/or roti. I don’t think there is a way for this to taste bad, every time I had it it was delicious.

It’s funny, when my boyfriend and I were in New Zealand we really got into Indian food and of course Butter Chicken was a popular dish, according to the servers. When my bf’s parents came overseas to travel with us we went out for some great Indian food. His mom ordered the Butter Chicken. The server was a very nice Indian man who talked with us and gave us the low-down on Indian food; my bf’s dad is a social butterfly, so he got him talking 🙂 Anyways… the server told us that a lot of the food that they serve at their restaurants isn’t necessarily what they eat at home. For example: Butter Chicken. He said it is probably the most popular dish among the Kiwis (New Zealanders), but it’s so full of cream and butter… fat! and also sugar, that they normally don’t prefer it. They like the less popular dishes on their menus like the onion gravy (I remember him saying that one for some reason) and the less heavy dishes. He also said that they normally eat a healthier grain and not a lot of naan. I can’t remember the name of it, but he said it was baked or grilled and a lot healthier than what most Kiwis liked.

The whole time I kept thinking, “My bf’s Mom just ordered Butter Chicken… and you took her order like 5 minutes ago AND we ordered naan. Ha!”. It was really interesting though to hear this from our server… I never knew! Lucky me I’ve found an amazingly healthy Butter Chicken alternative: “Butter Chicken Pies”. I found it in the Healthy Food Guide (a New Zealand magazine) that I got from the local library in Auckland (where we stayed while studying abroad). I added more vegetables and made 4 servings. I guarantee you will LOVE this!

Serves 4, one pie per person. Total time: 45 minutes

Ingredients:

1 boneless, skinless chicken breast

1 tsp chilli powder

1 tsp ground cumin

1 tsp ground coriander

1 tsp grated ginger (or 1/4 – 1/2 tsp ground)

1/4 cup nonfat plain yogurt

4 tbsp tomato paste, divided

1 tbsp lemon juice

1 tsp oil, olive or vegetable

1 medium onion, chopped

2 cloves of garlic, chopped

2 cups vegetables of your choice, chopped how you want them… broccoli, carrot, zucchini, summer squash, peas, etc (I used 1 cup broccoli and 1/2 cup each of zucchini and carrots)

1 tbsp brown sugar

1 cup fat free evaporated milk

10 sheets of phyllo dough, thawed

Salt to taste (kosher of course)

Cooking spray

Directions:

First things first, thaw that damned phyllo dough. I am NOT a fan of using this product. It’s finicky and a major pain in the ass. However, it usually turns out well. I must admit that instead of thawing it for 2 hours (I don’t have that kind of time… and I’m usually not that ahead of the game), I defrosted it in the microwave for a little while, making sure it didn’t get too warm blah blah blah. Just thaw it however you want and are used to; I personally think it doesn’t matter how you thaw it… it’s annoying to work with period.

Cut the chicken into small cubes and place in a bowl with the yogurt, spices, lemon juice, and 1 tbsp tomato paste. Mix well and marinate for 20 minutes in the refrigerator (or up to 8 hours).

In a frying pan heat oil and saute the onion and garlic until soft. Gradually add the marinated chicken to the pan, stirring frequently.

When all the chicken and marinade are in the pan add the remaining tomato paste, brown sugar, and vegetables.

Then gradually add the evaporated milk, stirring frequently. Do not let the mixture boil or it will split. But if it does it’ll just look grainy and the flavor won’t be affected.

*Feel free to test the sauce and add salt to your taste. I added a few pinches of kosher salt:)

Once the sauce is thick and creamy and the chicken is thoroughly cooked, remove the pan from the heat and assemble the pies.

Heat the oven to 400. Lay out 2 sheets of phyllo dough and spray the top with cooking spray. Add 1/4 of the butter chicken mixture, fold the sides in, and roll into a pie:

*The dough may kinda fall apart when you first start rolling it, but it’ll be okay once you finish and put it on the cookie sheet.


Spray the top with cooking spray and put onto a greased cookie sheet. Do the same with the rest. Bake for 20-25 minutes until golden and crispy!

I must admit.. this is one of my favorite dishes, hands down! You won’t believe how flavorful this is.. plus it’s hearty, fills me right up.

NUTRITIONAL INFORMATION:

Calories: 304   Fat: 5g (saturated 1g)   Fiber: 3g   Protein: 24g   Sodium: ~636mg

These pies, per serving, provide almost 50% of your daily recommended protein, 67% of Vitamin A, 55% Vitamin C, and 46% Niacin (a B Vitamin). It’s also rich in all the B Vitamins and provides 1/4 of your daily recommended Calcium! Wow, this recipe is killer. I’ll take your thanks in advance and just say you’re welcome 🙂

Chicken Sausage with Quick Sauerkraut

27 Jun

I love this recipe! It is easy, healthy, and delicious. I really started getting into it when I was studying abroad in New Zealand. My boyfriend and I would cook meals together and this was one we both liked; there is meat, but it is healthy… it looks like a brat with ‘kraut, it’s extremely fresh tasting, and… it’s cheap!

In New Zealand they really focus on local farmers and the quality of their products reflects that! The chicken sausages we bought were perfect: big 🙂 juicy, full of flavor, and healthy! I have yet to find a product in the States that is comparable, but I’ve got my eyes peeled. I have been using turkey dogs or sausage lately.

I like mine open face on Sonja’s Special (my homemade bread… post coming soon!) with a little bit of mayo and dijon mustard… yummm. This serves 4-6.

I got this recipe from eatingwell.com and changed it just a tad.

Ingredients:

12 oz chicken sausage links (or turkey dogs/sausage… use 4-6 depending on who you are feeding)

1 tsp oil (olive or vegetable)

1 small yellow onion, thinly sliced

1 Granny Smith apple, thinly sliced

1 10 oz package shedded cabbage (or about 4 cups thinly sliced Napa cabbage)

1/4 cup cider vinegar

1/4 tsp salt

1 cup apple cider or 100% juice

Directions:

Cook sausages separately until brown on all sides, 2-3 minutes. Transfer to a plate.

Heat oil in a large pan on medium heat, add onion and apple slices.

Cook until starting to brown, a few minutes. Add the vinegar, cabbage, and salt. Cook until the cabbage is starting to wilt, stirring occasionally. Add cider/juice, bring to a boil. Once boiling, add sausages, reduce heat, cover, and simmer for 10 minutes or until the quick sauerkraut is to your liking.

*I made 4 servings, but there is definitely enough quick sauerkraut to have 6 sausages in there (I did it all the time in NZ). You can save this for a great sack lunch the next day; something different than the regular sandwhich lunch (although there are numerous creative sandwiches out there.. just saying; it’s different, ok!).

Serve open face on wheat or rye bread with a variey of mustards.. like I said, I’m a fan of dijon. Grainy mustard is good too though. You can also stuff it into a whole wheat hot dog bun, your choice!

NUTRITIONAL INFORMATION (1/4 recipe… not including chicken/turkey sausages)

Calories: 90  Fat: 1g   Fiber: 3g   Protein: 1g   Sodium: 162mg

Add the nutritional specs of your chosen sausage. I decided not to include them because they can vary by up to 100 calories and have different grams of fat. I like to pick a sausage that is no more than 200 calories, don’t forget you are still adding bread to this as well. Overall, this recipe is almost fool-proff againt unnecessary calories and fat.

Once you make this you will once again be reminded that healthy food DOES taste good! Enjoy 🙂

Curried Chicken Wraps

20 Jun

I love curry… I discovered my love for Indian (and other Middle-Eastern) cuisine while studying abroad in New Zealand. There were authentic Indian restaurants in every town. This is a quick and healthy recipe with “sweet as” flavor (New Zealand saying). Sweet as what? No… just “sweet as”, bro (said more like “bru”).

I was surprised to find how much I love this curried chicken wrapped in a cabbage leaf! The crunch it gives is essential. This is slightly adapted from MyRecipes.

Ingredients:

1 lb skinless, boneless chicken breasts

2 tbsp red curry paste*

1/2 tsp salt

1/2 medium-sized English cucumber, diced

1/2 small onion, chopped

1 tbsp oil (vegetable or olive)

4-8 cabbage leaves, you can either split your serving in two leaves or have it all in one

cilantro

lime

*I used a red curry paste that has additional seasonings and isn’t as potent so I used 3 tbsp of it; pure red curry paste is best, but make do with what you can find at your supermarket.

Directions:

Cut the chicken into many small pieces, combine it with the curry paste and salt. Add the oil to a large sauce pan and cook the chicken.

Halfway through the cooking process add the onion and cucumber. Cook until chicken is done and tender.

This recipe serves 4… like I said you can either have 2 small cabbage leaves full or one fairly big leaf full. Add chopped cilantro and fresh lime juice. Fold the cabbage leaf around the curried chicken and enjoy! *Do not use the darker colored cabbage leaves that are on the outside of the vegetable… not good. How do I know? I wish it wasn’t from experience.

NUTRITIONAL INFORMATION:

Calories: 174   Fat: 5g (saturated .6g)   Protein: 26.7g   Fiber: .3g   Sodium: 507mg

Left-overs? If you don’t want to eat it in a cabbage wrap again you can wrap the meat (use a lot less, 1/2 or less of what you stuffed the cabbage with) in a flour tortilla. Add some sliced tomato, julienned cabbage, cilantro, and lime. Add a little mozzarella cheese or other light flavored cheese if you want as well.


Queen Frostine’s Chicken Marinade

20 Jun

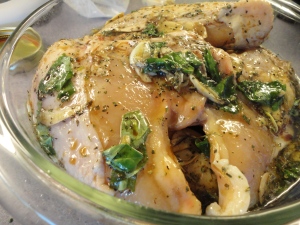
This is a Queen Frostine recipe that has been adapted from my Grandpa’s recipe (the only change is using fresh garlic… Queen Frostine wants her name on things 😛 ). My family has grown up using this marinade for our grilled chicken, it is a staple, especially in the summer. If you let it marinate overnight and baste the chicken with the left-over marinade while cooking the flavor will be out of this world! You can feel free to use fresh herbs if you have them just triple the amount you would use for dried… for example: 1 tsp of dried basil = 3 tsp (or 1 tbsp) fresh basil.

I went back up north to visit my family in my hometown, Washburn, WI. Haven’t heard of it? I’m not surprised or offended, but maybe you’ve heard of Bayfield? Or the Apostle Islands (Madeline Island is a major one) on Lake Superior. Anyways… We used this marinade with chicken for my mom’s 55th birthday dinner.. my manly man grilled it to perfection and it was delicious!

Ingredients:

1/3 cup soy sauce (reduced sodium preferred)

1/3 cup oil (olive or vegetable)

1/3 cup red wine vinegar (balsamic may also be used, but it’s more expensive and has a much stronger flavor)

1 1/2 tsp dried oregano

3/4 tsp dried basil

3/8 tsp black pepper

2-4 garlic cloves chopped (or 1/2-3/4 tsp garlic powder)

Directions:

Combine all ingredients in a large bowl, add chicken, cover, and refrigerate for 3-24 hours.

This recipe is enough for 4+ chicken breasts. For the birthday bash we used 5… maybe 6 chicken breasts. You can add water if needed. Move the chicken around a few times for an even marination (apparently this isn’t a real word as my spell check informed me… oh well!).

*I’m sure this would be good for turkey breasts as well.

The best way to cook your chicken is on the grill! Baste it with the left-over marinade like I said and you will get something similar to this!

The nutrition facts are for 8 servings. For 4-6 chicken breasts, I assumed, and I usually don’t/can’t eat a whole chicken breast. Also, it’s unlikely that all the marinade is used so it’s kind of a guesstimate (but this is a word… nice, spell check). Don’t fret… it’s healthy enough 🙂 

NUTRITION FACTS:

Calories: 89   Fat: 9g (saturated 1g)   Fiber: 0g   Protein: 1g   Sodium: 352mg

Calzones

13 Jun

Look at that edging!! Skill… actually this was my first time trying it. It makes them look great and more… professional? restaurant-ish? Yes, both. This is a Queen Frostine creation. It started with Bolso, which is a pocket of dough stuffed with a ricotta cheese, egg, and green olive mixture. Now.. when I was younger I was not the biggest fan of them, but for some reason my mom kept forgetting this. When she made them…”Oh, Sonja! I made your favorite Bolso.” “Mom… these are Bjorn’s (my younger brother) favorites, not mine.” “Oh…”. Granted when we were younger we both had what I like to call “penis haircuts”. Yes, I looked like a boy (and a penis) for part of my childhood and my 2nd grade school picture is a testament to that.

My mom started experimenting with this and we all fell in love with these calzones. What you put on the inside is up to you, I LOVE turkey pepperoni and cheese. I don’t suggest putting sauce inside because they might explode, but go for it if you’ve done it before.

Ingredients:

1 recipe of Pizza Dough (Bread Machine) OR buy refrigerated pizza dough (enough for 2 pizzas)

1 cup mozzarella cheese, grated

1 cup reduced-fat cheddar, grated

1/2 cup parmesan cheese, grated

1/2 tsp dried basil

1/4 tsp dried oregano

Pinch (or two) of kosher salt

Freshly ground black pepper (to taste)

Approximately 45-60 turkey pepperoni slices (about 3 servings.. apparently), 4-5 pieces per calzone

Cornmeal

Warm water (to moisten edges of calzones so they seal)

Directions:

Lightly grease 2 cookie sheets (I use cooking spray).

Combine cheeses and spices in a bowl:

 Pull out turkey pepperoni.

After making your dough, pull it out of the bread machine, and cut into 12 equally sized pieces (or use the refrigerated store-bought dough). 

Using a rolling pin and cornmeal roll out a piece of dough to about this size I did mine below:

Add a generous 3 tbsp of the cheese-spice mixture (you can measure it once then use the visual as a guide for the rest), or about a small handful. *Put your cheese and pepperoni in the lower half of the dough, not the middle.

Add 4-5 turkey pepperoni slices:

Now, using the warm water moisten the outer parts of the dough, fold the top over, and seal. You can use the pattern I did or just press it together and make crimped edges. All that matters is that the calzone is sealed, yet somehow a few of them always ooze cheese. Put it on a baking sheet and do the same for the rest!

Put 6 calzones on each baking sheet and cover with a warm, damp cloth for about 30 minutes. Preheat your oven to 350 degrees. Once the calzones have puffed up a little, put them into the oven for 25-30 minutes… until they are golden. Yields 12 delicious calzones. Feel free to brush the tops with an egg wash (beaten egg with water or milk) and sprinkle with dried herbs or kosher salt. They are best dipped in marinara sauce, but I’m sure they would be awesome with alfredo sauce, meat sauce, vodka sauce… get creative!

Don’t worry if you can’t eat them all, they freeze very well! I make a batch, save 4 for myself for one week and store the rest in the freezer. Whenever I want one I pull it out of the freezer an hour or so beforehand pop it into the refrigerator or leave it out. To heat them up, you can warm them in the oven or microwave them (about 20-30 seconds is best or else the dough gets tough).

Mix up what you put into your calzones, cheese is a must for me, but you can add other things that you would normally top your pizza with:

mushrooms, artichokes, olives (green or calamata are best), different meats, etc…

NUTRITIONAL FACTS (1 calzone):

Calories: 230   Fat: 5g (saturated 3g)   Fiber: 3g   Protein: 14g   Sodium: 603mg

*Changing the cheeses and “toppings” for this recipe will alter the nutritional specs. Just keep it within moderation and you’ll be in the ballpark of these nutritional facts… don’t worry.

Spinach, Bacon, and Tomato Egg Bake

13 Jun

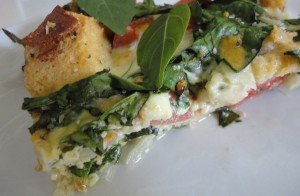
This recipe originated from one I found on eatingwell.com for “Broccoli-Cheese Pie”. One day I wanted to make it, but didn’t have broccoli. I decided to change up the greens. After a while this recipe evolved and it is delicious! It is really easy to throw together and forget in the oven for 45 minutes.

 I especially love this dish because it’s not as calorie-ridden as quiche because it doesn’t have a crust, it has bread IN it instead. However, I adore quiche (especially the crust haha). My mom made a mexican one for the morning after my birthday (my 21st birthday to be exact :S) that I will be making soon and hopefully posting on here.. if I approve it.

This can be eaten for breakfast or dinner… I personally LOVE it for dinner; it’s light and fresh, and who doesn’t like breakfast for dinner? Hey, even if you don’t.. I think you’ll still like this recipe, I mean come on… it has bacon in it and it’s still healthy.  It’s best with fresh basil on top and kosher salt.

Ingredients:

2 cups whole-wheat bread cubed (or whatever bread you have on hand)

1 1/4 cups skim milk

4 large eggs, lightly beaten

1 medium onion, chopped

2 1/2 oz bacon cut into cubes, you can opt for turkey bacon too

1 cup mozzarella cheese, shredded

2 medium tomatoes, de-seeded, chopped

10 oz spinach, washed, and roughly chopped (about six cups)

1/4 tsp salt (more kosher salt for garnish)

1/2 tsp dried basil

1/4 tsp dried oregano

freshly cracked pepper

Directions:

Preheat your oven to 350 degrees.

Combine the milk, spices, eggs, onion, cheese, and bacon (if you want you can cook the bacon first, but make sure to keep the bacon fat. Use this to grease your baking pan:) ) Whisk to combine. Now add the tomatoes and spinach. It will look like it won’t cook right, but the spinach will wilt a lot!


Now put it all into your greased pan:

 *I was only making this for myself so I cut the recipe in half to make 3 servings and baked it in a bread pan!

You can use a 9 x 9 square or round pan, whatever you want. Bake at 350 for 45-50 minutes, until golden. Let it cool for a few minutes and then dig in! This yields 6 servings.

NUTRITIONAL INFORMATION:

Calories: 263   Fat: 14g (saturated 5g)   Fiber: 3g   Protein: 16g   Sodium: 483mg

*This dish gives you 101% of your daily recommended Vitamin A! It also provides ~293% of Vitamin K (wow), 34% Vitamin C,  32% folate, and more (good source of manganese, selenium, phosphorus, calcium, and protein!). If you don’t know what these vitamins and minerals are or what they do feel free to leave a comment for more information. Or you can always find some answers on the web.

NZ Pizza Dough

3 Jun

I actually prefer this dough because it’s faster to make and has less calories overall than the bread machine dough. I started using this recipe when I was studying abroad in New Zealand. I of course didn’t have my bread machine with me so I started making all of my breads the old way; however, contrary to popular belief it’s very easy to make this pizza dough the “old way”.

Ingredients:

First stir

3/4 cup + 2 tbsp warm water

2 1/4 tsp yeast (active dry)

1 tsp sugar

1/2 tsp salt

After stirring together let stand until yeast dissolves (about 5 minutes). There will be little bubbles on the surface.

*UPDATE (8/15/11): Instead of sugar use honey! The dough rises faster and you’re using a less processed sweetener.. for those who care 🙂

Then add:

1 tbsp olive oil (stir completely to combine)

1 cup whole wheat flour

1 cup all-purpose flour

2 tbsp cornmeal

Knead the dough until it’s smooth and elastic. Place it in an oiled bowl and turn to coat. Cover and let rise until double in size, about 1 hours time.

        1 hour later:   

After the dough has risen take it out, cut until 2 equal parts and roll out 2 pizzas using cornmeal to ensure the dough doesn’t stick to the rolling pin or your working surface. I find it best to bake my dough for a few minutes while I prepare my pizza toppings so the crust is really crisp.It’s best to heat your oven to it’s hottest, I did mine at 500 degrees. And there is no need to go out and buy a pizza stone, just bake the crusts before adding the toppings, flipping once to get both sides crisp.

Be creative with your toppings: use fruit (pears and blue cheese), cured meats (prosciutto or pancetta), different cheeses, and experiment with olives and specialty items (you don’t need much because they go a long way) that will heighten the flavor of your pizza.

*I made mine without tomato sauce (a white pizza). I used sliced tomatoes, a little drizzle of olive oil, mozzarella and cheddar cheeses, and turkey sausage. All topped off with fresh basil and kosher salt after baking! Yummmmm 🙂

–> I am in LOVE with kosher salt. It’s great to sprinkle over all sorts of dishes. Pizza, egg bake, burgers, etc… try it and I guarantee you will not regret it (if hypertension is an issue for you… obviously shy away from this. Balsamic vinegar on pizza can help replace salt and has very little sodium. Also, try additional spices to increase the flavor of all your cooking).

NUTRITIONAL INFORMATION (1 whole pizza or 1/2 the recipe):

Calories: 563.5   Fat: 9g (saturated 1.5g)   Fiber: 10.5g   Protein: 17.5g   Sodium: 589mg

Now… for 1/4 of a pizza (or 1/8 of the recipe) the specs are:

Calories: 140.9   Fat: 2.25g   Fiber: 2.6g   Protein: 4.4g   Sodium: 147.3mg


Pizza Dough (Bread Machine)

2 Jun

This is the recipe my family has been using for our homemade pizzas for years! It’s really easy, delicious, and pretty darn healthy. However, if you do not have a bread machine I have another pizza dough recipe (I will post very soon) that can be ready in 1 hour and doesn’t require a bread machine. It’s just really nice to be able to put all the ingredients in and hit the dough cycle, pull it out when it’s ready, roll out the pizzas, assemble, and bake to perfection!

Put these ingredients into your bread machine in this order and select the dough cycle (mine takes 1 hour and 20 minutes)

1 5/8 cups water (1 1/2 cups plus 2 tbsp)

3 cups white flour

1 cup whole wheat flour

1 tbsp sugar

1 1/2 tsp salt

1 T dry active yeast

Once the dough is ready take it out and form into either 2 regular sized pizzas or several individual pizzas. However, if you don’t need 2 crusts, form the one you won’t use, bake it at 350 for 10 minutes and then freeze it until you need to make a homemade pizza and… voila! Instant delicious homemade pizza in about 20 minutes.

I also use this pizza dough to make 12 calzones (another recipe I will post soon). They freeze well and you can be as creative as you want… the sky’s the limit!

NUTRITIONAL INFORMATION (1/2 the recipe or 1 pizza):

Calories: 902.5   Fat: 3.5g (saturated .5g)   Fiber: 19.5g   Protein: 31.5g   Sodium: 1755.5mg

So… for 1/8 of a pizza without toppings added (1/16 of the total recipe) the specs are:

Calories: 113   Fat: .5g   Fiber: 2.4g   Protein: 4g   Sodium: 219.4mg

Versatile Salmon Burgers

19 May

My Aunt brought this recipe to our family a few years ago and we’ve enjoyed it ever since! It’s a healthy and easy way to get more Omega-3 fatty acids which are essential unsaturated fats you can get from cold water oily fish (such as salmon, sardines, herring, etc), other oily fish (like tuna), some plant sources (certain nuts), eggs, grass-fed beef, lamb, and chicken.

This recipe uses canned salmon and other budget-friendly ingredients. I love making these burgers and freezing half of them so I can pull them out whenever I need a quick meal or need to save some money at the grocery store that week.

The main thing I want to instill is being creative! It’s so easy to get in a rut when you are heating up left-overs, but trying different dipping sauces, breads, burger toppings, etc can lift you out of your nightly rut without making a completely different meal.

Salmon Burgers


Ingredients:

1 (14 oz.) can Pink Salmon, drained & flaked

2 T lemon juice

1 ½ T Dijon mustard

½ C sliced scallions or chives

¾ C dry bread crumbs

3 egg whites (or 1 whole egg and 1 egg white)

Directions:

Combine all and form into 4-8 patties; grill in oil. Serve on toasted whole wheat burger buns with a light drizzle of maple syrup and soy sauce (reduced sodium is best), light mayo, cilantro, and shredded carrot.

Other burger toppings: spinach, water chestnuts, sliced tomato, chives or scallions, grated ginger… be creative!

NUTRITIONAL INFORMATION (8 patties including 1 T maple syrup and a dash of soy sauce):

Calories: 172   Fat: 3g (1g saturated)   Fiber: 1g   Protein: 14g   Sodium: 462mg

This recipe provides about 612 mg of Omega-3 fatty acids; 55% of women’s recommended daily intake and 38% for men!